How do I get better at mobile photography?
Dec 06, 2021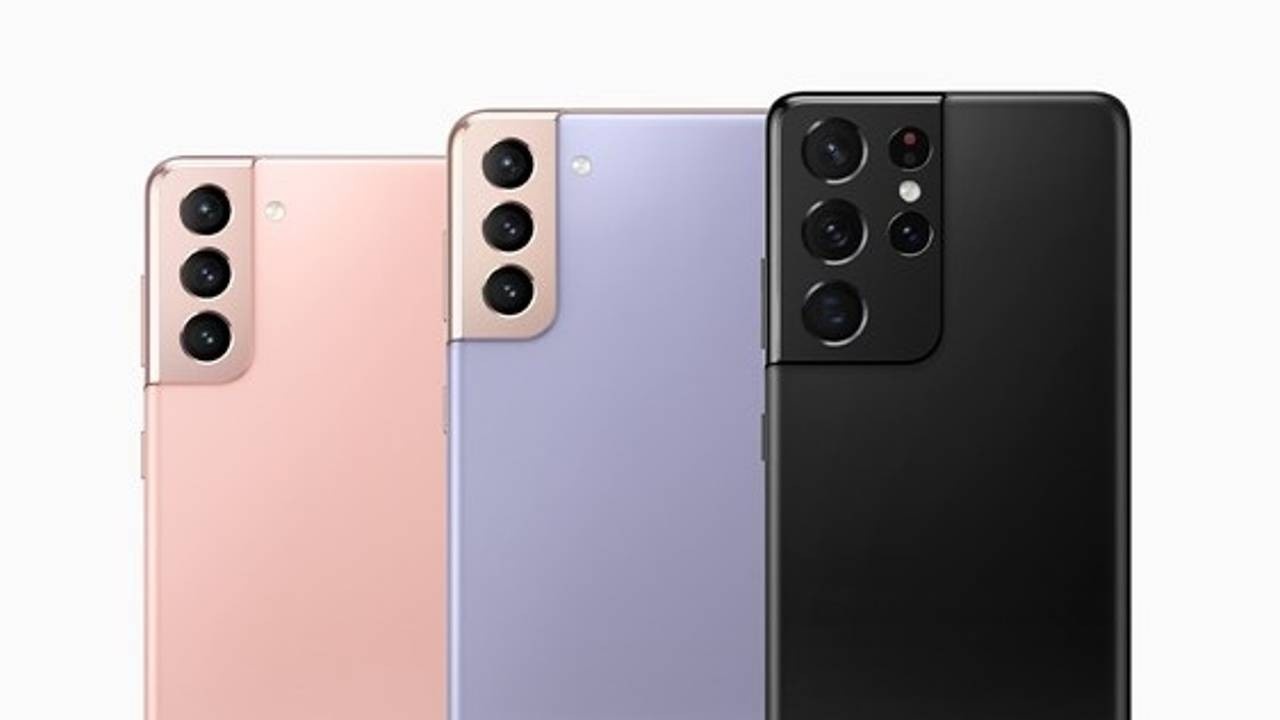
How do I get better at mobile photography?
Have you ever wondered how do people take such amazing photos with their mobile and post them on their Instagram accounts? The thing is I've always had the latest Samsung with the best built-in camera but still wasn't able to take such amazing shots. So I wondered how do I get better at mobile photography with my Samsung without having to be technical or spend hours learning it?
After doing tons of research and actually practicing these tips myself It turns out there are many quick and easy tips and tricks that anyone can use to take better photos with their mobile and improve their Samsung photography instantly.
Here are my top 20 best mobile photography tips that will help you take your photo game up a few notches:
TABLE OF CONTENTS: 20 MOBILE PHOTOGRAPHY TIPS
- To get crystal-clear photos, keep your phone still and steady.
- Simple compositions provide the best results.
- To take clear photos, always check your lens is clean.
- Create original images by using different angles and perspectives.
- Use the focus feature to keep your subject in focus.
- Take Multiple Photographs of Your Scene
- When possible, stay outside and use natural light.
- Don't Use The Digital Zoom on your mobile phone camera
- For photos with high detail and even lighting, use HDR.
- Use Portrait Mode to get a beautiful blurred backdrop.
- Use exposure level to achieve optimal brightness levels.
- Shoot in Burst Mode To Capture Amazing Action Moments.
- Using different Samsung lenses will allow you to zoom in or out.
- Use night mode when shooting in low-light conditions.
- Use Pro Mode To Capture Professional-looking Photos On Your Smartphone
- Use RAW mode for photos taken in Pro mode
- Use The Right Apps To Take Better Quality Samsung Photos.
- Use Motion Photo Option Capture Moving Images.
- Try Long Exposure Photos Using Pro Mode on your Samsung
- Buy the latest Samsung Model with a better camera.
Top 11 Mobile Photography Composition Techniques For Beginners:
- The Rule of Thirds
- The Rule of Direction
- The Rule of Odds
- Leading Lines Leading The Eye
- Negative Space
- The Power of Symmetry
- Central Placement :
- Diagonal Balance
- Strong Patterns and Repetition
- Framing
- Depth Of Field
20 Samsung Photography Tips to Improve Your Mobile Photos
The key to great Samsung mobile photography is simple. You just need a few quick and easy tips for taking amazing pictures with your phone! Read our tutorial today, where we show you 20 different techniques that will have any amateur photographer Samsung mobile shots looking professional.
1. To get crystal-clear photos, keep your phone still and steady.
This one sounds obvious but is so important. You would be surprised how many people end up with blurry pictures because they didn't hold their phones properly! You can easily take a blurry photo if your phone is shaky or moves while you're taking the picture. Just make sure you're holding it in your hand steady and still before pressing the shutter button, if you have time, you can always rest the elbows on a solid surface. Another option is to use a tripod or selfie stick! These accessories will help ensure that your Samsung mobile photos come crisp.
So hold still and watch out for shaking hands!
2. Simple compositions provide the best results.
Although you might be tempted to quickly snap a photo of whatever is in front of you, it's important that you take the time to think about your composition. This will make sure that all the elements in your photograph come together and are able to draw attention.
The more distractions are in your shot, the less attention it will be able to attract. So make sure that you look carefully at what's in your frame before snapping a photo!
To keep it simple, just remember that the best photos are often composed simply. This is because the more simple the shot is the more clear the main subject is.
To get started with this tip for better Samsung mobile photos, try centering your shot or using the rule of thirds. These are both simple ways to compose your pictures that will make a big difference!
You can also use different elements in the photo, like lines or shapes, to create better compositions for Samsung photos. For example, if you have some straight lines next to each other in one of your shots it may be a good idea to center your shot.
The key is taking time to think about what you're photographing and how you want to capture it in an image.
You can also use different elements in the photo, like lines or shapes, to create better compositions for Samsung photos.
3. To take clear photos, always check your lens is clean.
This one sounds a bit silly, but it's really important to make sure that your lens is clean before you take a Samsung photo!
If there are smudges or dirt on the glass of your camera this will result in photos with less clarity and more blur. To get better shots from your phone, try wiping off any dust particles or dirt with a microfiber cloth.
If you don't have one of these then you can also try using your t-shirt or another piece of fabric. As long as it is soft, almost anything will work! Just make sure that whatever you're using to clean your Samsung mobile lens doesn't leave lint on the glass.
Another option if you don't have a microfiber cloth or don’t want to ruin your shirt is to carry around some lens cleaning wipes. These can be found online and in stores for just a few dollars, which makes them really easy and cheap ways to keep the smudges away!
So remember, always make sure that you check your Samsung mobile lens before you take a photo. You'll be happy that you did when your pictures are clear and crisp!
4. Create original images by using different angles and perspectives.
It's easy to take the same type of photos as everyone else. This is especially true when it comes to mobile photography because we all have phones that can capture images! So if you really want your Samsung photos to stand out try using different angles and perspectives in your shots. This gives your photos a unique look and feel that will make them stand out from the crowd by showing the world in a way that you don't usually see.
This is just one way that you can use angles and perspectives in your Samsung mobile photography to create original images!
Boring and typical photos tend to be at eye-level height, but why not try getting low down or looking up high? For example, if you're photographing a flower then it may be better to lay on the ground and shoot from below.
Different angles allow you to highlight different things in your photos, which is great for making original images! You can use this tip to get better Samsung mobile photos by trying to take some shots down from a low angle.
This is especially useful when it comes to photographing architecture. If you're shooting a building, for example, try standing across the street and taking your photo from that angle rather than right up close to it. This will give people viewing your images an entirely different perspective on whatever it is that you are photographing!
With this tip for better Samsung photography, the possibilities are endless. You can try all sorts of unique angles and perspectives to capture some truly original images!
5. Use the focus feature to keep your subject in focus.
This tip for better Samsung mobile photography is all about the focus feature. This can be found on most modern smartphones and allows you to choose where your photo's focal point will be!
The simple way of using this function is to tap on what it is that you want to take a picture of, which instantly focuses on that object or area.
This focus feature is useful for mobile photography because it helps the viewer of your photos to instantly know what you are trying to highlight and what your main subject is. This can make all the difference in your photos and allow you to take better Samsung images.
The autofocus feature in contrast will try to give the overall image a nice, balanced look; however, this may not always be what you're looking for, which is why it's important to use the manual focus function. Sometimes autofocus will try to automatically choose what it thinks is your main subject. It may get the job right most of the time, but sometimes it will focus on something that isn't that important in the background or foreground of your photo!
So remember, if you want better Samsung mobile photos then be sure to utilize this tip by using the focus feature
This focus feature is also great for making original shots because it gives you more control over what will be focused on! You can use this option when taking a picture of food by tapping on different things like the plate, tea, or tablecloth.
This will make for a more interesting image and give people viewing it a better understanding of what you were trying to capture with your mobile phone!
6. Take Multiple Photographs of Your Scene
Taking multiple shots of the same scene is a great way to get better Samsung mobile photos.
This tip for better photographs means that you don't need to worry about taking bad images or getting your perfect shot in one go! You can take so many different angles and perspectives within one scene, which will allow you to be more creative with how your final image turns out.
With this tip, you can take multiple shots of the same scene to make one original photo! For example, if you are looking at an old building then try taking photos from different angles and perspectives in order to get a really interesting final product.
If that's not your kind of thing though then there is no harm in taking multiple shots of the same scene to ensure that you have at least one good shot!
This tip will allow for more creative control over your photos and help you take better Samsung images with less effort.
7. When possible, stay outside and use natural light.
This tip for better Samsung photography is all about using natural light to take your photos. Photography is all about light because if you think about it your camera lens is just a light-capturing device.
Natural light is a photographer's best friend because the quality it gives off is unbeatable! Natural Light is one of those things that you can't really control but can take advantage of.
As weird as it may sound, the quality of mobile phone images actually gets worse when you're inside a building! This occurs because there is less available light to work with, resulting in a less appealing photo.
It may seem that the easiest way to combat this problem is by taking your photos outdoors, but that's not always the case. When photos are taken outside during a sunny day (at midday) usually there will be too much light, and that's when you are running the risk of being overexposed! This type of light is called "hard light" and it is the worst type of light for mobile photography.
Overexposure occurs when there is too much available light in one area of an image and causes it to become washed out or white with little detail remaining. Most phones cameras now have HDR feature that can help to combat this issue, however, if you want to avoid strong highlights and shadows in your shots then it is best to take photos outside during certain hours or cloudy conditions.
For this reason, it's best to try and take your photos outside during the golden hour. The golden hour is one hour before sunset or sunrise when natural light is at its most beautiful diffusion and strength; it occurs in both morning and evening which makes for prime time photograph taking! Another option is to shoot when it's a cloudy day (great for portrait photography)- that way you get nice even distributed light without running the risk of overexposure or having strong highlights or shadows.
8. Don't Use The Digital Zoom on your mobile phone camera
This tip for better Samsung photos is all about avoiding the use of a digital zoom on your mobile phone. Most modern-day mobile phones have very high-quality cameras built into them, so there really isn't any need to rely solely on zooming in with the camera's digital zoom option.
Using a "digital" or "optical" zoom may seem like it will give you more control over how close up and detailed an image gets but that couldn't be further from the truth! Digital zooms don't work by actually bringing objects closer to your lens via moving parts inside the camera- instead, they just crop into sections of your photo using software within their processors, which can result in less than optimal.
Optical zooms use the physical elements in your lens to bring light and objects closer together at a high quality, so you can get nice clean images without losing any detail or degrading their quality.
The solution? Always try to use your Samsung's optical zoom instead. In most cases this feature should allow for an up-to x10 magnification without losing any quality from using digital alternatives. For example, Samsung S21 Ultra has four lenses on the back: a standard zoom, an ultrawide lens, a 3x optical zoom and a 10x optical zoom.
If you want better photo quality and sharpness in general try and avoid zooming as much as possible; instead move closer to objects for more interesting angles, experiment by varying different focal lengths/zooms etc. This way you won't lose any details from cropping.
9. For photos with high detail and even lighting, use HDR.
High Dynamic Range (HDR) is a great feature for mobile photography that helps to capture better Samsung photos by improving lighting and tonal range. HDR works by taking multiple exposures of the same photo at different levels, then merges all these images into one photograph using layers in order create an even more detailed image with less noise. Essentially it's computational photography at its finest.
This is a great feature for capturing better quality images when you are in challenging high exposure situations for example when you are outdoors on a bright day, the sun can cause problems with harsh lighting and strong shadows. HDR helps to solve this issue by reducing high contrast levels from light areas being overexposed.
In order to activate the HDR mode on your mobile phone, you will need to find this option in your camera settings and turn it to auto mode. Then experiment with both options; sometimes taking multiple exposures works well depending on how much detail there is present in an image (for example landscapes may require more than one exposure whereas portraits usually work fine using just one).
In most cases when you have very contrasting scenes or elements within your shot there's going to be some areas within where detail is lost due to heavy shadows or bright highlights- this isn't always noticeable but can lead to a loss in quality if not addressed properly. In fact, sometimes having too much contrast can make details hard to see altogether!
You may not want to have HDR turn on all the time. In specific situations, for example, when photographing silhouette photos you want to have strong outlines of your silhouettes without any detail being seen in them. HDR actually makes it hard to take good silhouette shots because it preserves the details in the dark areas, sometimes making them even look greyish.
So remember: always try HDR on high contrast shots such as landscapes or panoramas where detail is usually lost in bright areas of an image; you will be surprised at how much better your photos look using this technique!
10. Use Portrait Mode to get a beautiful blurred backdrop.
Portrait mode is a great feature for taking better quality Samsung photos because it allows you to create professional-looking shots that look like they were taken with an expensive DSLR camera.
This technique uses the depth of field effect which blurs out an image's background and brings attention to your subject by creating a narrow depth-of-field (blurred background).
In order to use this mode, you will need to find it in your camera settings and make sure Portrait mode is selected. With the latest Samsung models, you can change the intensity of the blur effect, giving you even better control over your blurring effects and allowing for stunning professional-looking shots in portrait mode!
With the later Samsung Galaxy phones, you can now use the selfie camera for portrait mode effect as well. If you are by yourself this is great for easily taking portrait photos of yourself but bare in mind the quality of portrait photos will be better if you use the rear cameras.
11. Use exposure level to achieve optimal brightness levels.
This tip is useful for better-quality Samsung photos because it helps to capture more detail in the brightest and darkest areas of your image. This level of control is great for making sure your images are spot on with optimal brightness levels.
To access this control simply go to camera mode and tap the screen and the camera will try to focus and set exposure correctly using that point as a reference. Now, this is where the white circle appears. You can toggle the exposure manually by swiping left and right below the circle and if you want to lock these settings simply tap and hold until it the circle turns yellow and a small padlock appears - the exposure and focus are now fixed and will not if you move the camera. If you want to unlock it simply tap on another area of the camera app.
12. Shoot in Burst Mode To Capture Amazing Action Moments.
Samsung's burst mode allows you to take great action shots and capture the perfect moment every time!
To access this setting simply go to the camera app and hold the volume button (which acts as a shutter button). The camera will take many burst shots that you can choose from to find the perfect one!
This is a good technique for those who love taking action shots and want to get a shot that perfectly captures the moment. You can also use this technique to capture the perfect selfie because you will have plenty of shots that you could choose from.
The best time to use burst mode is for capturing fast-moving subjects such as a group of people, animals or even sporting events.
13. Using different Samsung lenses will allow you to zoom in or out.
The different lenses on Samsung phones allow you to either zoom in or out when capturing a photo. The telephoto lenses of x3 and x10 on Samsung S21 Ultra are great for this, especially when you need to reach into your subject and get closer to it, or step back and give your subject some breathing space.
An example of this is if you are trying to capture a landscape shot with an amazing sunset in the background but all you can see is too much sky because of how far away from the scene you are standing; zooming out will allow for more ground so that the sunset is more visible.
The other ultra-wide lens on the Samsung Galaxy models will allow you to capture more of your subject in one shot without having to step any closer. This is also great for landscape shots, instead of having to step closer you simply use the ultra-wide lens and capture more in one shot.
The ultra-wide lens is also great for group shots where you need to fit everyone in the shot. Instead of having to step back and try to get everyone in one shot, you can instead use the ultra-wide lens on your Samsung phone and capture a large group all at once!
14. Use night mode when shooting in low-light conditions.
Samsung's night mode is great for low-light conditions because it illuminates your subject with more light. This allows you to capture better quality Samsung photos in dark areas or even at night time when the sun goes down!
Night mode is a great setting for taking better quality Samsung photos that will be more detailed and brighter than usual, this works by combining multiple shots into one photo to reduce noise levels and create images of higher detail in dark settings.
Night mode is also great for those who love taking photos at night! Instead of having to rely on the flash and create harsh images with lots of shadows, you can use this setting that allows you to capture better quality Samsung photos in dark surroundings.
To access this setting simply go into camera mode and tap on "night" which will be located by next to the different modes slider. This mode will allow you to capture better-quality photos in dark areas and collect more light for a brighter shot!
To get a nice crisp shot using night mode make sure you hold your phone as steady as possible when taking the shot. If you move your camera too much you will end up with terrible-looking blurred photos.
15. Use Pro Mode To Capture Professional-looking Photos On Your Smartphone
The pro mode is a great setting for those who want more control over their mobile photography, it allows you to adjust many different aspects of your photo such as exposure compensation, ISO levels and white balance; this gives professional mobile photographers total control over their camera and how they capture a photo.
You can also adjust the exposure in your settings when in this mode, which is great for those who want to take better quality Samsung photos that are more detailed and well-lit by capturing more light from their subject/scene! This works by allowing you to increase or decrease the amount of time it takes for the sensor to read and capture more light.
This also works great for those who love taking photos of the moon or stars! Instead of having to rely on auto mode, pro mode allows you to capture better quality Samsung photos in dark settings by increasing your exposure time. This will allow more light from these objects to enter into your camera sensor and give a brighter shot overall.
The pro mode also has an auto-ISO feature which will allow the ISO to automatically change depending on the amount of light that is available in a scene, this will result in better quality Samsung photos as you can adjust your ISO levels yourself.
To access the pro mode simply go into camera settings and tap on "pro" which will be located by next to where you can adjust your flash. The list of features that are available in this mode is extensive so make sure you experiment with each setting for better quality Samsung photos!
Use Pro Mode to shoot at slower shutter speeds or higher ISO values if needed.
16. Use RAW mode for photos taken in Pro mode
With the latest Samsung Galaxy models such as Samsung S21 Ultra. The camera lets you take photos in RAW format with low noise or more vibrant colors than those taken in JPEG mode (no post-processing). This means no brightening or changing the colors of your photo – it's all pretty much left up to you!
RAW mode is great for those who want better-quality images that have not been processed or changed in any way, this means you can take a photo and then edit it on another program of choice such as Photoshop or Lightroom.
To automatically save RAW copies of your shots in your Samsung simply your Samsung camera settings > format and advanced options and turn on the "RAW copies option" which will save JPEG to RAW copies of pictures in Pro mode.
17. Use The Right Apps To Take Better Quality Samsung Photos.
There are many different photo-editing apps available on the Google Play Store that work great for enhancing your photos, they allow you to take better quality Samsung photos by applying cool effects and filters!
Some of these apps include "Vintager" which is a cool app that allows you to add vintage-style effects and filters on your photos which is great for mobile photographers who want a unique look, "Instagram" which is another good photo app that lets you adjust different aspects of the photo such as exposure or saturation levels.
Another really popular photography editing tool includes "Snapseed", this app is great for those who want to adjust different aspects of their photos such as exposure, contrast, and saturation.
There are many other free apps available on the Google Play Store which include: "VSCO," "Afterlight" and more, just search for your favorite photo/photo-editing app and download it today!
18. Use Motion Photo Option Capture Moving Images.
Samsung's latest mobile models such as the Samsung Galaxy S21 and Note 11 allow you to capture moving images. Motion Photo adds a little more story to your photos by allowing you to capture a few seconds of activity leading up to when the shutter button is pressed. It also allows you to pick which moment in time you'd want to keep as a still frame.
To activate this option simply go into your camera settings and look for "Motion" located between "Timer" and "Voice Control". To take a motion shot simply tap the circular button located at the top of your mobile screen.
You may also convert motion photos to gifs and share these photos as video files when it comes to sending photographs with friends and family.
19. Try Long Exposure Photos Using Pro Mode on your Samsung
If you want to capture long exposure photographs on your Samsung then simply go into the "pro" mode - when in pro mode tap on the 'shutter speed' icon and select a longer shutter time, this will allow you to take longer exposure Samsung photos.
For example, you may want to take long exposure photos of a beautifully blurred waterfall, or blurred city lights or star trail images.
Try experimenting with various different types of mobile photography such as: using a tripod or stabilizing device that will help reduce any unwanted movement of your phone/camera which can result in blurry photos.
20. Buy the latest Samsung Model with a better camera.
This may seem like an obvious point, but there is no better way to upgrade the quality of your mobile photos than by buying a new model that includes an advanced camera. The latest Samsung models such as Samsung Galaxy S21 Ultra include some of the best cameras on any smartphone today!
The latest Samsung mobile models come with the best technology available, they contain more camera lenses and larger sensors that allow for better quality photos and videos. The Galaxy S series are great examples of this, especially the Samsung Galaxy S21 Ultra.
Having said that, you may have the best camera in the world and still take terrible photos. So while it's great having the latest camera it is not the main deciding factor that makes your mobile photography great. Your camera is just a tool and it's how you use the tool that matters.
If you are a beginner and just really want to fast-track your photography skills without worrying about the latest phone and its camera features then you need to focus on composition techniques!
How do beginners learn mobile photography?
The best way for beginners to learn mobile photography is by practicing simple composition techniques. These are timeless principles are used by photographers around the world take to take stunning photos.
What is composition?
Composition is simply the way you arrange your subject in a mobile photo. It is the placement of your subject, background, and foreground in a way that makes sense to you as a photographer.
There are many rules and guidelines that can be used to help you compose better mobile photos with your Samsung.
As a beginner, you should try and master the following 10 composition techniques:
Top 11 Mobile Photography Composition Techniques For Beginners:
1. The Rule of Thirds
What is the rule of thirds?
The rule of thirds is a basic photographic composition technique that photographers have been using for decades, it is a classic compositional guideline that states an image should be imagined as divided into nine equal parts.
Basically, it involves dividing your mobile photo into nine equal parts by two equally-spaced horizontal lines and two vertical lines as seen in the image below:
This grid divides your mobile phone screen into three sections both horizontally and vertically which adds an extra element of interest to your photograph.
Your subject should be placed along one or more of the lines, or where the lines intersect as this creates a dynamic frame within which you can place your mobile photo subjects. This is because it draws attention to an area that would otherwise not be noticed by viewers in many other types of mobile photos.
In addition, if you use the rule of thirds to place your subject in a position where two horizontal and vertical lines intersect - this is often referred to as 'power points' or sometimes called 'sweet spots'.
Keep practicing the rule of thirds technique until it becomes second nature.
2. The Rule of Direction
What is the rule of direction?
The idea behind the rule of direction composition technique is to create a sense of motion or action within your photo by placing key elements in an area where lines are naturally moving towards.
Rule of direction dictates where you position your main subject since you need plenty of space where you're subject is moving. If a person walking, running or jumping you want to have lots of space in front of the subject so that the eye can follow where the subject is moving, otherwise if you cut the subject off from the frame, it will create an odd feel in your shot as if the subject is walking out of the frame.
If the subject is moving to the right then you should position them in left side of your mobile photo.
There is also implied direction, which refers to elements in your frame that can dictate your shot, for example, wind in the trees, or where the eyes are looking in a portrait photo. For example, you want to have plenty of space where the subject is looking since the eyes have implied direction.
3. The Rule of Odds
What is the rule of odds?
The rule of odds generally states that it is better to have an odd number of subjects and an even number of subjects. So for example having 3 apples (subjects) on the table will tend to look better than having 2 apples on the table. For some bizarre reason, it just tends to look better.
This is something that you can play around with if your photo ends up having an even number of subjects, maybe try removing one subject or adding an extra element within the shot.
The general consensus is that having an odd number of subjects creates a more dynamic feel to your mobile photo, whereas even numbers can be seen as too symmetrical and lack creativity which does not engage the viewer's eye.
4. Leading Lines Leading The Eye
What are leading lines?
Leading lines are another popular mobile photography composition technique. They are used to direct the viewer's eye into your photograph, towards your subject or focal point. Leading lines can be found in any landscape photo that incorporates a road, path or even natural features such as rivers and mountains. They can also be created.
How do I use leading lines in my mobile photos?
The first step is to look around you while out and about during your day-to-day life - whether it's on the bus, walking down the street or waiting at a train station. You will start to notice that many of the things around you incorporate leading lines.
The most common types of leading lines that you will encounter in mobile photography are:
- Diagonal lines:
These can be found in many mobile photos and are often used to lead the viewer's eye into your photograph, towards a subject or focal point. In addition, they add an element of interest that would otherwise not exist if you took a photo without any diagonal lines present. Diagonal lines tend to create tension and drama in your shots, so it's great to experiment with diagonal lines in the forest where there are usually lots of them.
- Curved Lines:
Curved lines are similar to diagonal lines in that they can be used to lead the viewer's eye into your mobile photo. However, unlike diagonals which go from corner-to-corner of a frame - curved leading lines often form circles or semi-circles within an image.
- Straight Lines:
Straight lines are also used in mobile photos to help direct the viewer's eye into your photo and towards a subject or focal point.
However, straight leading lines can be much harder to find than diagonal and curved ones - which makes them more effective when placed within a composition as they add an element of surprise that can be quite compelling for viewers.
- Horizontal Lines:
Horizontal lines are found in many places, including the ground or horizon of a landscape photo. As with vertical leading lines - horizontal ones can help direct the viewer's eye into your mobile photography composition to focus on specific areas within it.
However, they tend to be less effective than diagonal and curved leading lines because there is little variation when using them.
- Vertical Lines:
Vertical lines are the opposite of horizontal ones in that they direct viewers into your mobile photo along a single axis rather than two. Although vertical leading lines can be effective when used correctly, you should avoid using too many throughout an image as this can make it look unbalanced and potentially confusing for viewers to determine where they should look or what is of importance within it.
Keep practicing leading line techniques until it becomes second nature.
5. Negative Space
What is Negative space?
Negative Space is the opposite of positive spaces. It refers to empty areas in your photo that are not covered by any objects or subjects. Using negative space can help create a more harmonious composition and make your subject stand out even more!
How do I use Negative Space in my mobile photos?
There are many different ways to incorporate Negative Space into your mobile photography. One of the most common is known as 'Foreground and Background'. In this technique, you place a subject or focal point within your foreground - which provides an interesting base for your image that draws viewers' attention towards it.
The use of negative space often makes your photos very compelling because there are no distractions or competing focal points that can be found elsewhere. This draws attention towards your focal point in a more subtle way, rather than using a distracting background or cluttered composition.
It is often used in wedding photography to create a romantic feel, but can also be employed by photographers of all skill levels.
Negative space is also found in the sky of images and can be used to show off clear blue skies - which are often preferred by viewers as they add an element of calmness within your mobile photography that helps break up any lines or objects present along the ground.
While negative space is often used to enhance composition, In portraits, for example, negative space is often found behind the subject to help them stand out from their surroundings and draw attention towards them alone.
Negative space is a powerful technique that can help create more compelling mobile photos with minimal effort. It is a great tool to help create more compelling compositions in your mobile photography. While it can be used alongside other techniques, negative space often provides a subtle yet very effective way of drawing attention towards specific areas within an image without being distracting or disruptive for viewers.
6. The Power of Symmetry
What is a Symmetrical Composition?
Symmetrical composition is one that appears balanced and proportionate, with its various elements arranged neatly around a central focal point. This creates more harmonious compositions which appear balanced and proportionate - making it very pleasing for viewers to view.
The human brain loves symmetry because it's predictable but also interesting at the same time. It is one of the most common techniques employed by mobile photographers, although it can be difficult to get right.
There are many different ways to use symmetry in mobile photography. One of the most common is combining it with leading lines which can be used along a horizon or through trees, buildings and other objects within your scene to help guide viewers' eyes into your subject area.
The symmetrical compositions created by using this technique often contain an even number of objects, which can be divided into either two or four groups - giving them a balanced and proportionate feel. An example could be three trees on the left side of your frame with another three trees on the right, or a building with another building opposite.
How do I use Symmetrical Composition in my Mobile Photography?
Symmetrical composition works well with images that have strong lines or elements running along their perpendicular axes - such as a road leading towards the horizon. It does not work so well with vertically orientated lines - such as a tall building in the center of your frame.
While it is often used to create balanced and harmonious compositions, symmetry can also be very effective when combined with other techniques like leading lines or patterns.
How can I make my mobile photos more symmetrical?
To use this technique effectively within your mobile photography, you should aim to place elements along both sides of your frame and use the corners of the frame along with the gridlines to really to get your shot as symmetrical as possible.
- Aim for a balanced and symmetrical composition with an even number of objects on either side
- Make sure your subject is the focus point in your mobile photo
- Make sure you are standing in the middle of the structure.
Where can I find Symmetrical Composition in my mobile photography?
Symmetrical compositions can be found in many different types of mobile photography. Here are just a few examples:
- Landscape and nature scenes
- Architecture
- Portrait photography
- Macro photography
7. Central Placement :
What is a Central Subject Placement?
Central subject placement is a mobile photography composition technique that involves placing your main point of interest along the center of your frame. This creates a balanced and harmonious feel with everything looking evenly placed within the photo, but it can also leave compositions feeling very flat as there often isn't much going on in terms of lines or objects running across from side to side.
How do I use Central Subject Placement?
Central subject placement is best used for images where the main point of interest you are trying to capture sits along the central axis of your frame. For example, this could be a single person standing within an empty room or it might be something like a tree that stands out against its surroundings.
While the central placement technique can be very effective in some genres, it is not always best practice to use this mobile photography composition method. For example, if you are photographing a portrait of someone then placing their face right down the center will often feel uncomfortable and unnatural - especially when combined with other techniques like symmetry or rule of thirds.
8. Diagonal Balance
What is Diagonal Balance?
Diagonal balance is a mobile photography composition technique that involves placing your point of interest along one of the main diagonal lines within your frame. This will help give images more depth and emphasis as the eye naturally follows these types of lines across from side to side - creating an interesting effect in most situations!
How do I use Diagonal Balance?
Diagonal balance is best used in compositions where your point of interest isn't necessarily located centrally or along the vertical/horizontal axis. For example, this could be a person walking toward the side of an image or it might even be something like a tree with branches growing out from one corner into another!
Diagonal balance tends to make your photos feel more balanced and harmonious as the eye follows lines across from side to side. Usually, diagonal balance is used when you have multiple subjects, this way you can balance them across the image.
Another great use of diagonal balance is when you have a large subject in one corner of the frame and you want to balance it with another subject, creating a much more balanced shot. These types of shots are a little more advanced since you are dealing with multiple subjects.
9. Strong Patterns and Repetition
What is Pattern Photography?
Pattern photography is a mobile photography composition technique that involves finding patterns within everyday life and photographing them. The idea here is to find something existing in the world around us - like lines formed by people walking across a room, or objects arranged together on a table, then use this as your main point of interest for images!
How do I use Strong Patterns as a Composition Technique?
Strong patterns are best used for images where you want to create something interesting that focuses on the pattern itself. For example, this could be an image of a long line of people or it might even be something like brightly colored fruit arranged together on a table.
Pattern photography is all about finding interesting patterns, which you can either create for yourself by arranging objects in your scene or through things that already exist around you! Once found, the main idea here is to place these elements right at the center of your frame, which will help draw the eye toward them.
Strong patterns are not always best used in compositions where you want to create a balanced and harmonious scene - rather this technique can often be used when you are photographing something that already has an interesting pattern or composition, to begin with!
When it comes down to taking strong patterns shots, the main idea is to place your pattern at the center of your frame and have it lead out from there. This will help with creating an interesting composition that draws in viewers from different angles!
The biggest takeaway with patterns is to find strong repeating patterns and really try to fill up your frame to emphasize the is the appealing pattern to the eye.
10. Framing
Try framing objects by capturing the corners of buildings, trees or other natural features that surround your subject matter. This will help focus attention on what you are photographing and create a pleasing frame around your photo.
How do I use Framing as a Composition Technique?
Framing is best used in compositions where your point of interest isn't necessarily located centrally or along the vertical/horizontal axis. For example, this could be you photographing someone standing against an interesting background such as trees and shrubbery - which can help lead out from them into the picture!
Another great use of framing is when you have a large subject in one corner of the frame and you want to balance it with another subject, creating a much more balanced shot. This could be something like photographing an interesting building at night against some beautiful city lights - which will draw your eye toward both elements equally.
11. Depth Of Field
This is another essential mobile photography technique that will greatly improve your photos! The depth of field refers to how much of your photo is in focus from front to back. By using a shallow depth of field you can isolate your subject and make it stand out against the background, while a deep depth of field will help everything stand together as part of one scene.
How do I use Depth Of Field as a Composition Technique?
Depth of field is best used in compositions where you want to create one point of interest and have it stand out against the rest of your photo. For example, this could be photographing something like food up close so that only part of it is actually in focus while everything else is blurred and in the background!
Another great use of depth of field is when you want to create a sense of place, such as photographing people against an interesting city skyline or other natural features. This will help draw your viewer's eyes toward everything that is included within the frame - rather than just focusing on one specific element.
The main takeaway with depth of field is to experiment and see how far you can push it! For example, photographing something up close allows for a really shallow depth of field - while moving further away might give your image more context by including everything from foreground to background.
If you want to watch practical composition techniques tutorials then join over 6000 students at Samsung Photography Academy!